![[Appium Java] Bài 27 - Cài đặt và sử dụng Allure Report](/uploads/course/banner_course_appium_java_online_anh_tester.jpg)
NỘI DUNG BÀI HỌC
✅ Thêm thư viện Allure report vào project Maven
✅ Cấu hình class AllureManager
✅ Triển khai ghi logs cho report vào các vị trí cần thiết
✅ Xuất kết quả Allure report
Nếu bạn chưa biết mô hình đối tượng trang (Page Object Model) thì trước khi bắt đầu bài viết này mình khuyên bạn nên xem lại bài viết mô hình POM trong Appium Java của An. Tại vì những ví dụ sẽ chạy test case hoàn chỉnh nên An chạy code theo dạng page object cho nhanh á. Nội dung liên quan là TestListener.
Đối với những bạn muốn dùng Allure report độc lập thì cần xem hết video để hiểu rồi mới chuyển sang project khác tuỳ biến. Kẻo nó sai bước nào đó nó sẽ không xuất report được.
✅ Cài đặt Allure environment trên máy tính
Trước tiên, mình sẽ thêm biến môi trường Allure-2.27.0 vào máy tính của mình cũng giống như cài đặt biến môi trường cho Java JDK và Maven.
Mình đặt tên biến môi trường là ALLURE_HOME
Tải gói Allure-2.27.0 cho Window tại đây (cứ tải bản mới nhất nhé)
Cập nhật ngày 08/07/2025 phiên bản 2.34.1. Hướng dẫn bên dưới thì lấy phiên bản đã soạn sẵn 2.27.0 làm mẫu. (không chọn bản 2.27.0 nhé)
Vì An chỉ dạy trên môi trường máy window nên có gì các bạn kiếm bản cho MacOS hoặc Linux như hình hướng dẫn bên dưới:
Link download theo phiên bản: https://github.com/allure-framework/allure2/releases
Tiếp theo thì các bạn giải nén ra để nó vào ổ C (ổ chứa hệ điều hành) để tạo biến môi trường trong máy ổn định.
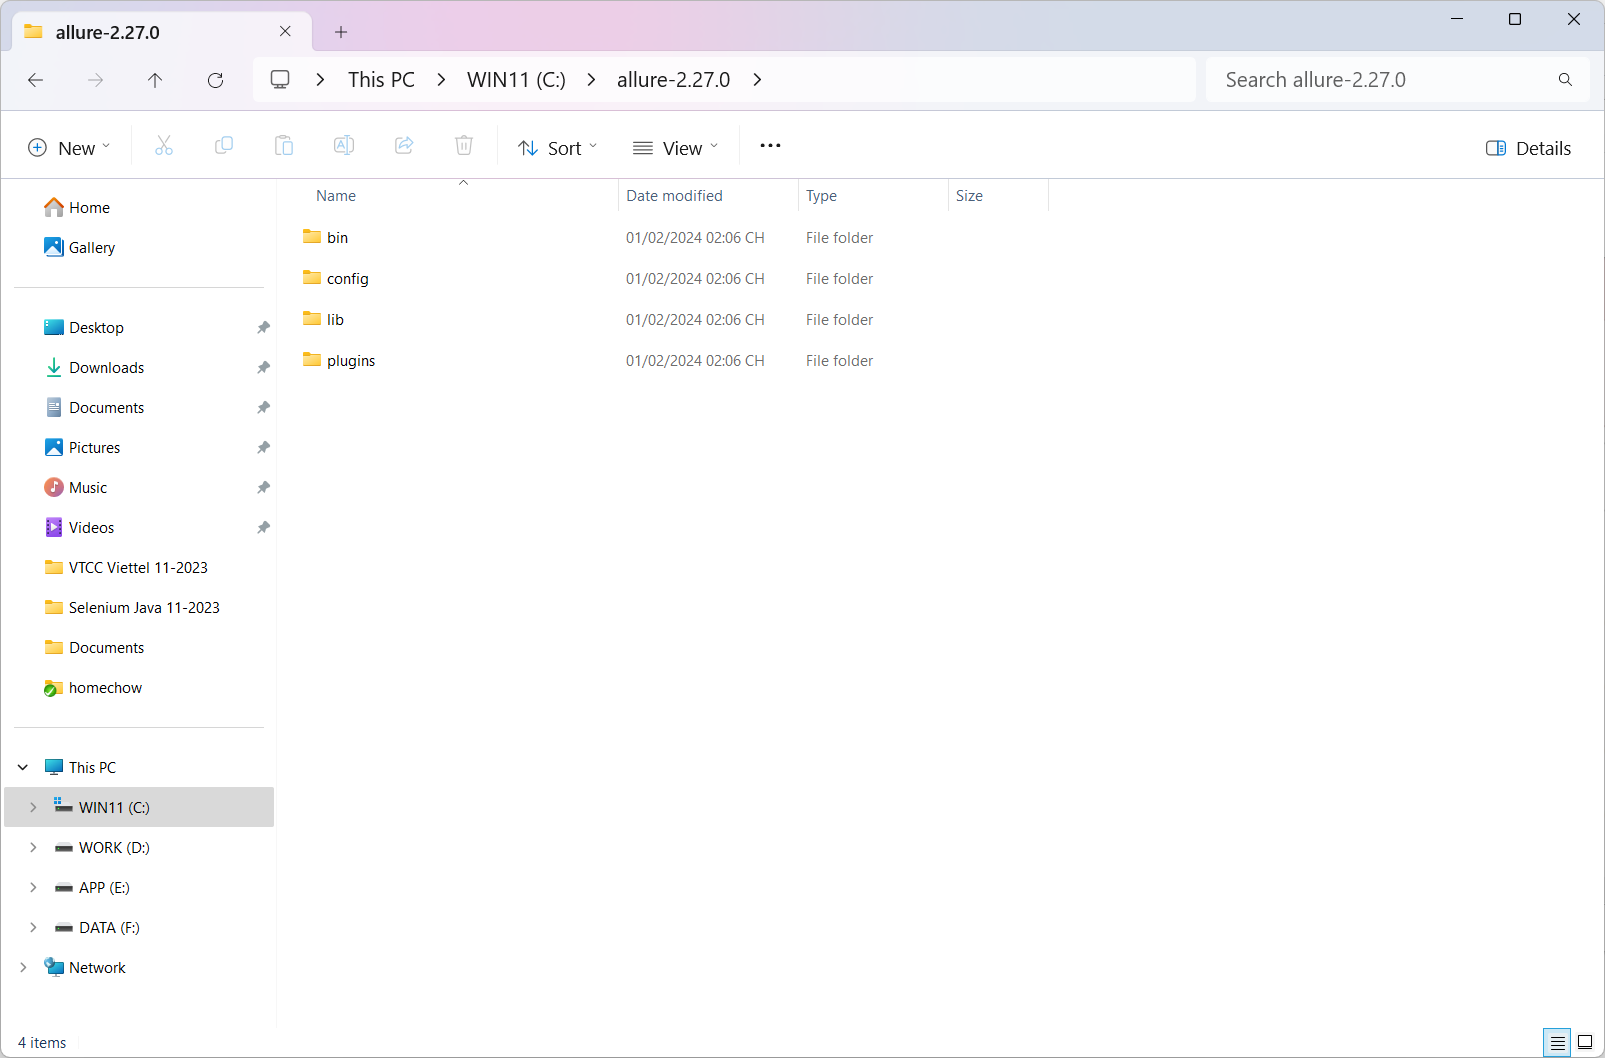
Tạo biến môi trường giống với setup biến môi trường Java JDK á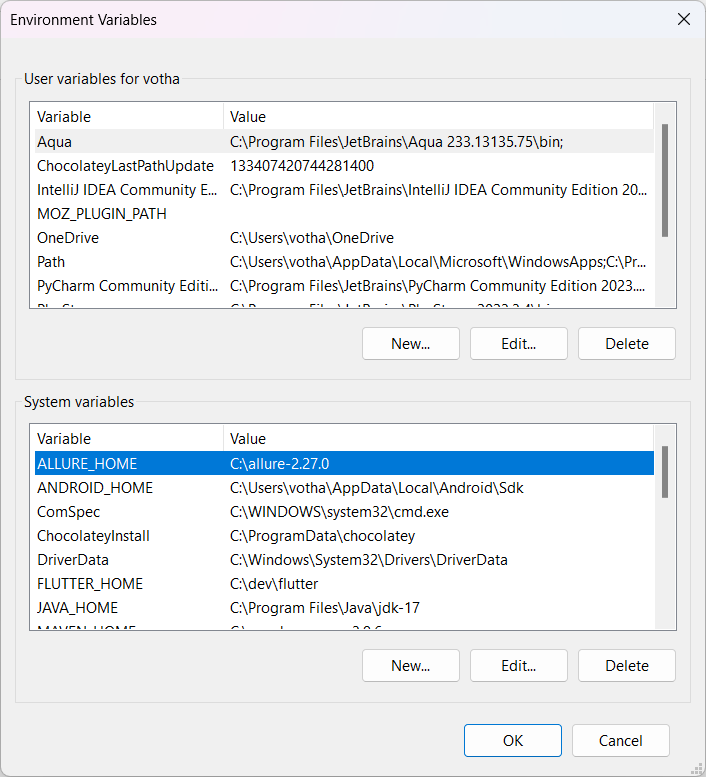
Edit biến path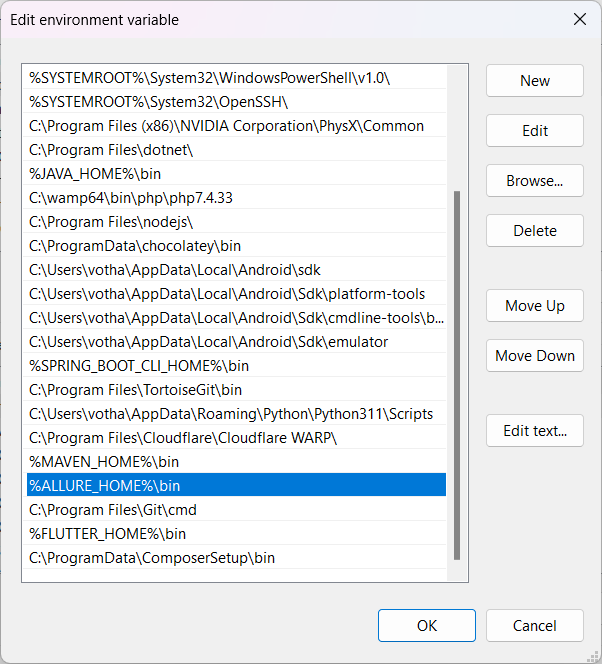
Chạy lệnh trong CMD để kiểm tra
allure --version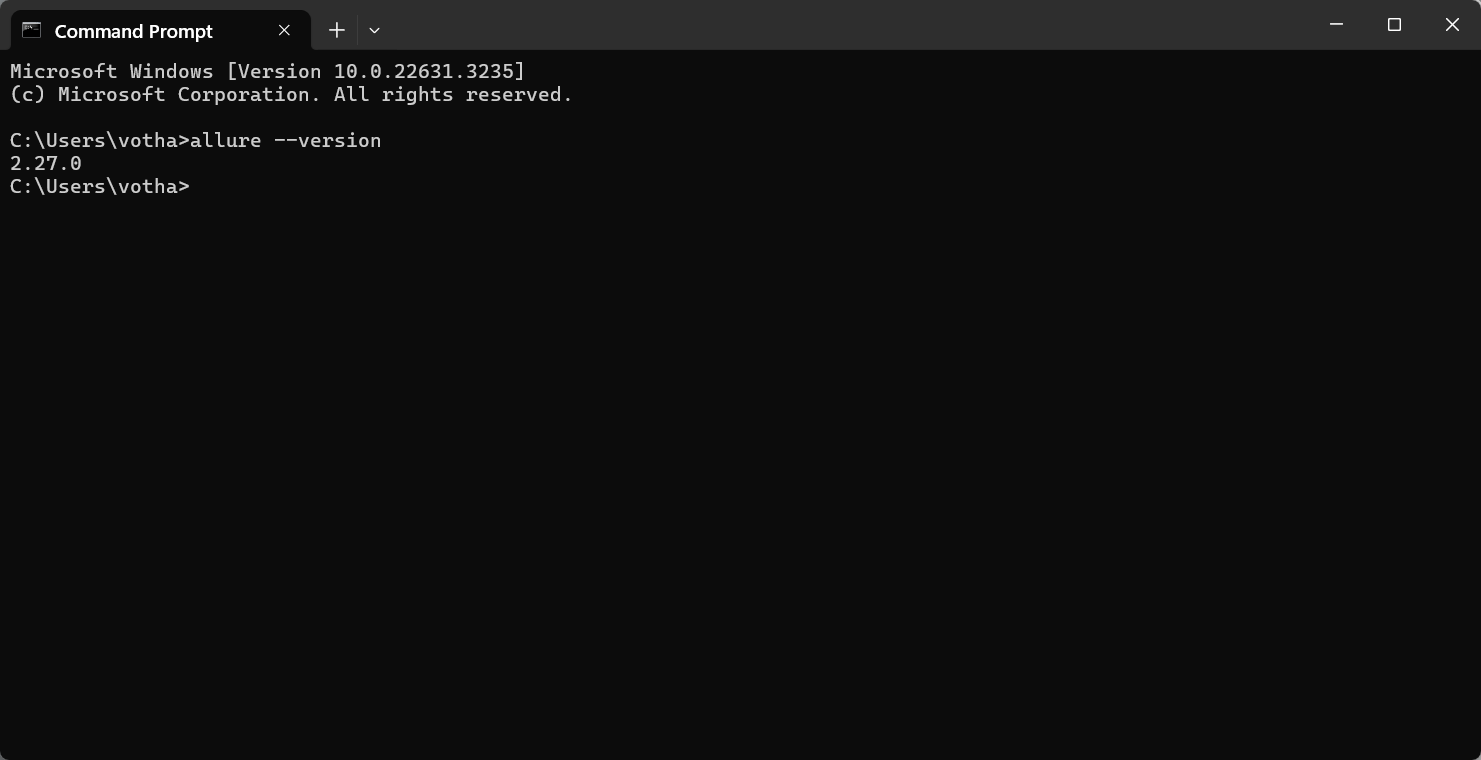
✅ Thêm thư viện Allure report vào project Maven
Cần 4 loại thư viện như bên dưới, cứ dùng version mới nhất. Vào từng đường dẫn xem version mới nhất thì copy vào.
 <!-- https://mvnrepository.com/artifact/io.qameta.allure/allure-testng -->
<dependency>
	<groupId>io.qameta.allure</groupId>
	<artifactId>allure-testng</artifactId>
	<version>2.29.1</version>
</dependency>

<!-- https://mvnrepository.com/artifact/io.qameta.allure/allure-attachments -->
<dependency>
	<groupId>io.qameta.allure</groupId>
	<artifactId>allure-attachments</artifactId>
	<version>2.29.1</version>
</dependency>

<!-- https://mvnrepository.com/artifact/org.aspectj/aspectjweaver -->
<dependency>
	<groupId>org.aspectj</groupId>
	<artifactId>aspectjweaver</artifactId>
	<version>1.9.24</version>
</dependency>

<!-- https://mvnrepository.com/artifact/org.projectlombok/lombok -->
<dependency>
	<groupId>org.projectlombok</groupId>
	<artifactId>lombok</artifactId>
	<version>1.18.38</version>
	<scope>provided</scope>
</dependency>
(Allure cập nhật ngày 29/11/2024)
Hoặc vào link này để download bản tùy ý:
https://mvnrepository.com/artifact/io.qameta.allure/allure-testng
Tiếp theo là thêm đoạn build dùng để thực thi và config allure trong maven. Các bạn chú ý là chúng ta sẽ để đoạn build ngoài thẻ dependencies nhé.
<build>
	<pluginManagement>
		<plugins>
			<plugin>
				<groupId>org.apache.maven.plugins</groupId>
				<artifactId>maven-surefire-plugin</artifactId>
				<version>3.5.3</version>
				<configuration>
					<suiteXmlFiles>
						<!-- Call Suite name -->
						<suiteXmlFile>suites/SuiteLoginTest.xml</suiteXmlFile>
					</suiteXmlFiles>
					<argLine>
                            -javaagent:"${settings.localRepository}/org/aspectj/aspectjweaver/1.9.24/aspectjweaver-1.9.24.jar"
                        </argLine>
					<testFailureIgnore>true</testFailureIgnore>
					<systemPropertyVariables>
						<!--Đường dẫn xuất ra report-->
						<allure.results.directory>target/allure-results</allure.results.directory>
					</systemPropertyVariables>
				</configuration>
			</plugin>
		</plugins>
	</pluginManagement>
</build>
- Chổ <suiteXmlFile>suites/SuiteLoginTest.xml</suiteXmlFile> chỉ đường dẫn đến file XML khi chạy trực tiếp từ pom.xml
- Chổ <allure.results.directory>target/allure-results</allure.results.directory> đoạn này chỉ đường dẫn xuất report. Nằm trong folder target. Nếu muốn mang ra ngoài thì sửa lại là allure-results thôi là xong.
Đây là tất cả các thư viện An đã add vào pom.xml của cả project đây:
<?xml version="1.0" encoding="UTF-8"?>
<project xmlns="http://maven.apache.org/POM/4.0.0"
         xmlns:xsi="http://www.w3.org/2001/XMLSchema-instance"
         xsi:schemaLocation="http://maven.apache.org/POM/4.0.0 http://maven.apache.org/xsd/maven-4.0.0.xsd">
    <modelVersion>4.0.0</modelVersion>

    <groupId>com.anhtester</groupId>
    <artifactId>AppiumJava122024_Multi_Platform</artifactId>
    <version>2.0</version>

    <properties>
        <maven.compiler.source>17</maven.compiler.source>
        <maven.compiler.target>17</maven.compiler.target>
        <project.build.sourceEncoding>UTF-8</project.build.sourceEncoding>
    </properties>

    <dependencies>

        <!-- https://mvnrepository.com/artifact/org.seleniumhq.selenium/selenium-java -->
        <dependency>
            <groupId>org.seleniumhq.selenium</groupId>
            <artifactId>selenium-java</artifactId>
            <version>4.34.0</version>
        </dependency>

        <!-- https://mvnrepository.com/artifact/org.testng/testng -->
        <dependency>
            <groupId>org.testng</groupId>
            <artifactId>testng</artifactId>
            <version>7.11.0</version>
        </dependency>

        <!-- https://mvnrepository.com/artifact/io.appium/java-client -->
        <dependency>
            <groupId>io.appium</groupId>
            <artifactId>java-client</artifactId>
            <version>9.5.0</version>
        </dependency>

        <!-- https://mvnrepository.com/artifact/io.github.ashwithpoojary98/appium_flutterfinder_java -->
        <dependency>
            <groupId>io.github.ashwithpoojary98</groupId>
            <artifactId>appium_flutterfinder_java</artifactId>
            <version>1.0.10</version>
        </dependency>

        <!-- https://mvnrepository.com/artifact/org.slf4j/slf4j-api -->
        <dependency>
            <groupId>org.slf4j</groupId>
            <artifactId>slf4j-api</artifactId>
            <version>2.0.17</version>
        </dependency>

        <!-- https://mvnrepository.com/artifact/org.slf4j/slf4j-simple -->
        <dependency>
            <groupId>org.slf4j</groupId>
            <artifactId>slf4j-simple</artifactId>
            <version>2.0.17</version>
            <scope>test</scope>
        </dependency>

        <!-- https://mvnrepository.com/artifact/com.google.code.gson/gson -->
        <dependency>
            <groupId>com.google.code.gson</groupId>
            <artifactId>gson</artifactId>
            <version>2.13.1</version>
        </dependency>
        <!-- https://mvnrepository.com/artifact/com.fasterxml.jackson.core/jackson-databind -->
        <dependency>
            <groupId>com.fasterxml.jackson.core</groupId>
            <artifactId>jackson-databind</artifactId>
            <version>2.19.1</version>
        </dependency>
        <!-- https://mvnrepository.com/artifact/com.fasterxml.jackson.core/jackson-core -->
        <dependency>
            <groupId>com.fasterxml.jackson.core</groupId>
            <artifactId>jackson-core</artifactId>
            <version>2.19.1</version>
        </dependency>

        <!-- https://mvnrepository.com/artifact/org.apache.poi/poi -->
        <dependency>
            <groupId>org.apache.poi</groupId>
            <artifactId>poi</artifactId>
            <version>5.4.1</version>
        </dependency>
        <!-- https://mvnrepository.com/artifact/org.apache.poi/poi-ooxml -->
        <dependency>
            <groupId>org.apache.poi</groupId>
            <artifactId>poi-ooxml</artifactId>
            <version>5.4.1</version>
        </dependency>
        <!-- https://mvnrepository.com/artifact/commons-io/commons-io -->
        <dependency>
            <groupId>commons-io</groupId>
            <artifactId>commons-io</artifactId>
            <version>2.19.0</version>
        </dependency>

        <!-- https://mvnrepository.com/artifact/org.apache.logging.log4j/log4j-core -->
        <dependency>
            <groupId>org.apache.logging.log4j</groupId>
            <artifactId>log4j-core</artifactId>
            <version>2.25.0</version>
        </dependency>

        <!-- https://mvnrepository.com/artifact/org.apache.logging.log4j/log4j-api -->
        <dependency>
            <groupId>org.apache.logging.log4j</groupId>
            <artifactId>log4j-api</artifactId>
            <version>2.25.0</version>
        </dependency>

        <!-- https://mvnrepository.com/artifact/io.qameta.allure/allure-testng -->
        <dependency>
            <groupId>io.qameta.allure</groupId>
            <artifactId>allure-testng</artifactId>
            <version>2.29.1</version>
        </dependency>

        <!-- https://mvnrepository.com/artifact/io.qameta.allure/allure-attachments -->
        <dependency>
            <groupId>io.qameta.allure</groupId>
            <artifactId>allure-attachments</artifactId>
            <version>2.29.1</version>
        </dependency>

        <!-- https://mvnrepository.com/artifact/org.aspectj/aspectjweaver -->
        <dependency>
            <groupId>org.aspectj</groupId>
            <artifactId>aspectjweaver</artifactId>
            <version>1.9.24</version>
        </dependency>

        <!-- https://mvnrepository.com/artifact/org.projectlombok/lombok -->
        <dependency>
            <groupId>org.projectlombok</groupId>
            <artifactId>lombok</artifactId>
            <version>1.18.38</version>
            <scope>provided</scope>
        </dependency>
    </dependencies>

    <build>
        <pluginManagement>
            <plugins>
                <plugin>
                    <groupId>org.apache.maven.plugins</groupId>
                    <artifactId>maven-surefire-plugin</artifactId>
                    <version>3.5.3</version>
                    <configuration>
                        <suiteXmlFiles>
                            <!-- Call Suite name -->
                            <suiteXmlFile>src/test/resources/suites/Suite_Bai27_AllureReport.xml</suiteXmlFile>
                        </suiteXmlFiles>
                        <argLine>
                            -javaagent:"${settings.localRepository}/org/aspectj/aspectjweaver/1.9.24/aspectjweaver-1.9.24.jar"
                        </argLine>
                        <testFailureIgnore>true</testFailureIgnore>
                        <systemPropertyVariables>
                            <!--Đường dẫn xuất ra report-->
                            <allure.results.directory>target/allure-results</allure.results.directory>
                        </systemPropertyVariables>
                    </configuration>
                </plugin>
            </plugins>
        </pluginManagement>
    </build>

</project>
✅ Cấu hình class AllureManager
Tạo class AllureManager để vào package reports. Hoặc muốn để đâu cũng được. Gọn ràng là được.
package com.anhtester.reports;

import com.anhtester.drivers.DriverManager;
import io.qameta.allure.Attachment;
import org.openqa.selenium.OutputType;
import org.openqa.selenium.TakesScreenshot;

public class AllureManager {
    //Text attachments for Allure
    @Attachment(value = "{0}", type = "text/plain")
    public static String saveTextLog(String message) {
        return message;
    }

    //Screenshot attachments for Allure
    @Attachment(value = "Page screenshot", type = "image/png")
    public static byte[] saveScreenshotPNG() {
        return ((TakesScreenshot) DriverManager.getDriver()).getScreenshotAs(OutputType.BYTES);
    }
}
✅ Triển khai ghi logs cho report vào các vị trí cần thiết
Các ghi chú trong Allure Report:
@Epic
@Features
@Stories/@Story
@Severity(SeverityLevel.BLOCKER)
@Description("In this cool test we will check cool thing")
@Step
@Attachment
@Link
Cái ghi chú quan trọng của mình là @Step. Nó đại diện cho từng @Test và chúng ta sẽ config nó sau. Còn cái Ghi chú còn lại thì bổ trợ làm rõ ràng hơn cho Suite test case.
Các bạn nghiên cứu thêm tại đây: https://allurereport.org/docs/testng-reference/
Demo: https://demo.qameta.io/allure/#behaviors
Thêm Allure Reports vào TestListener class
Chúng ta sẽ thêm 2 hàm từ AllureManager vào phương thức onTestFailue trong TestListener để ghi gì đó và chụp ảnh màn hình.
@Override
public void onTestFailure(ITestResult result) {
    LogUtils.error("Test case " + result.getName() + " is failed.");

    //Allure Report
    AllureManager.saveTextLog(result.getName() + " is failed.");
    AllureManager.saveScreenshotPNG();
}![[Selenium Java] Bài 33: Cài đặt và sử dụng Extent Report Allure Report | Anh Tester](/uploads/lesson/selenium_java/reports/add_allure_report_to_testlistener.png)
🔆 Tạo các steps detail trong Allure Report
Để thêm các bước chi tiết của test cases vào trong Allure Report thì chúng ta cần thêm các @Step vào trong custom keyword của mình, cụ thể là MobileUI keyword.
Ngoài ra còn các class như BaseTest cũng chứa thông tin setup cần thiết.
Detail giống như này:

🔆 Add step detail vào từng bước của test cases thì các bạn cũng làm tương tự như Log4j2 ghi log vào file là gọi nó vào trong MobileUI keyword
Ví dụ hàm clickElement trong MobileUI keyword
@Step("Click element: {0} within {1}s")
public static void clickElement(By locator, int second) {
    sleep(STEP_ACTION_TIMEOUT);
    LogUtils.info("[MobileUI] Clicking element located by: " + locator + " within " + second + "s.");
    waitForElementToBeClickable(locator, second).click();
}
Mình thêm cái @Step là để gắn step detail vào report. Các bạn ghi mô tả tuỳ ý.
{0}, {1},...đại diện cho giá trị của các tham số bên dưới phương thức. Theo thứ tự luôn nhé. Và bắt đầu từ 0 (tham số thứ nhất)
Và các bạn có thể thêm chi tiết hơn thông qua hàm ghi log vào Allure report bằng cách gọi hàm saveTextLog.
@Step("Get text from element {0}")
public static String getElementText(By locator) {
    sleep(STEP_ACTION_TIMEOUT);
    LogUtils.info("[MobileUI] Getting text from element located by: " + locator + " with default timeout.");
    WebElement element = waitForElementVisible(locator);
    String text = element.getText();
    LogUtils.info("[MobileUI] Retrieved text: '" + text + "'");
    AllureManager.saveTextLog("➡\uFE0F TEXT: " + text);
    return text;
}
Thêm vào class BaseTest
Sau khi chạy thì nó sẽ như này
🔆 Đính kèm hình ảnh vào Allure Report khi Test case Fail
Các bạn chú ý: phải dùng bản TestNG 7.4.0 thì Allure report nó mới hiểu Attachment cái file hình vào khi test cases Fail.
Cần có các thư viện sau vào pom.xml: Allure Attachments, Aspectjweaver và Project Lombok (chúng ta đã thêm bên trên rồi).
Còn nếu không dùng 7.4.0 thì có cách khác chuyên nghiệp hơn nhưng cần setup thêm.
✅ Xuất kết quả Allure report
Mở Allure Reports sau khi chạy test
Sau khi chạy test case các bạn thấy là nó sẽ tự sinh ra cho mình folder "allure-results" nằm trong target/allure-results nó chứa các file json. Đó cũng là data của report.![[Selenium Java] Bài 33: Cài đặt và sử dụng Extent Report Allure Report | Anh Tester](/uploads/lesson/selenium_java/reports/export_allure_report_to_target.png)
Từ giao diện IntelliJ IDEA, sau khi các bạn chạy test case trên xong thì mở "Terminal" lên để chạy lệnh sau.
![[Selenium Java] Bài 33: Cài đặt và sử dụng Extent Report Allure Report | Anh Tester](/uploads/lesson/selenium_java/reports/open_allure_report_1.png)
Hoặc![[Selenium Java] Bài 31: Cài đặt và sử dụng Extent Report Allure Report | Anh Tester](/uploads/lesson/selenium_java/reports/open_terminal_2-min.jpg)
Hoặc dùng phím tắt Alt + F12
Tiếp theo là chạy lệnh trong Terminal: allure serve target/allure-results
Sau khi chạy nó sẽ sinh ra cho mình folder tạm và host tạm để display Report.![[Selenium Java] Bài 31: Cài đặt và sử dụng Extent Report Allure Report | Anh Tester](/uploads/lesson/selenium_java/reports/auto_generate_report_folder-min.jpg)
Đợi tầm 3 giây nó sinh ra cho mình 1 đường link tự động mở trên Browser luôn. Không thì các bạn click link trong vùng Terminal như hình trên cũng được.![[Selenium Java] Bài 33: Cài đặt và sử dụng Extent Report Allure Report | Anh Tester](/uploads/lesson/selenium_java/reports/open_allure_report_3.png)
Giao diện từng Step![[Selenium Java] Bài 33: Cài đặt và sử dụng Extent Report Allure Report | Anh Tester](/uploads/lesson/selenium_java/reports/open_allure_report_4.png)
Nó đính kèm hình ảnh và câu text log mà mình ghi ở phần TestListener khi nảy.
Khi không cần xem report nữa thì mình tắt Terminal đi với phím tắt Ctrl +C sau đó chọn Y (đồng ý tắt) và Enter
🔆 Mở Allure Report bằng Maven
Để mở Allure Report bằng Maven trong pom.xml thì chúng ta mở tab Maven lên và gõ lệnh: mvn clean test
![[Selenium Java] Bài 33: Cài đặt và sử dụng Extent Report Allure Report | Anh Tester](/uploads/lesson/selenium_java/reports/open_maven.jpg)
![[Selenium Java] Bài 33: Cài đặt và sử dụng Extent Report Allure Report | Anh Tester](/uploads/lesson/selenium_java/reports/run_success_maven.jpg)
Chạy xong chúng ta gõ lệnh trong Terminal: allure serve target/allure-results
🔆 Mở Allure Report bằng một file HTML duy nhất
Để tạo Allure Report bằng một file index.html duy nhất cho tiện thì chúng ta gõ lệnh sau:
*** Lệnh này thì mặc định xuất ra folder allure-report:
allure generate --single-file target/allure-results
*** Lệnh này ghi đè lên folder allure-report đang tồn tại (thêm --clean):
allure generate --single-file target/allure-results --clean
*** Lệnh này xuất ra folder chỉ định cụ thể:
Ví dụ folder allure-report-2
allure generate --single-file target/allure-results -o allure-report-2
Sau đó vào thư mục "allure-report" ngoài cùng sẽ thấy file index.html![[Selenium Java] Bài 34: Cài đặt và sử dụng Allure Report | Anh Tester](/uploads/lesson/selenium_java/reports/create_allure_report_one_html_file.png)